Google now offers DNS TXT records as a form of site verification, this can be done via a Windows DNS server as follows:
1. Open dnsmgmt.msc 2. Select your domain 3. Right click, select new domain 4. Enter the name & select the folder icon 5. Right click Other new records 6. Select TXT - you'll see:
Text (TXT) record. Holds a string of characters that serves as descriptive text to be associated with a specific DNS domain name. The semantics of the actual descriptive text used as data with this record type depends on the DNS domain where these records are located. (RFC 1035)
7. Press Create Record. 8. Leave the top box blank and copy the value listed in "Other" in Google's verficiation
When you've done saving the TXT record, click the Verify button below on this page.
Congratulations! Your new DNS TXT record now contains your security token. Keep in mind that changes to your DNS settings can take up to 24 hours to propagate through the Internet, but depending on your host, this can happen faster.
If you have trouble adding your TXT record, contact your domain host directly for further assistance. If you're not sure what to say, here's a sample explanation that you can email to your host or read over the phone.
','GoDaddy.com':'
Log in to your account for reflector.webtropy.com at www.godaddy.com by clicking the My Account tab.
Under the Domains header, click (Advanced Details) to the right of reflector.webtropy.com.
Under the DNS Manager header, click Launch.
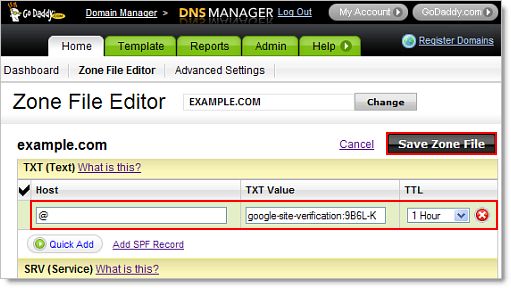
In the TXT (Text) section, click Quick Add.
In the Host field, enter @.
In the TXT Value field, copy and paste the following unique security token:
At the top or the bottom of the page, click the Save Zone File button.
Click OK in the pop-up.
Congratulations! Your new DNS TXT record now contains your security token. Keep in mind that changes to your DNS settings can take up to 24 hours to propagate through the Internet, but depending on your host, this can happen faster.
If you have trouble adding your TXT record, contact your domain host directly for further assistance. If you're not sure what to say, here's a sample explanation that you can email to your host or read over the phone.
','MelbourneIT.com.au':'
MelbourneIT doesn't support the TXT method of verification. Please select another verification method from the above list.
','Name.com':'
Log in to your account for reflector.webtropy.com at www.name.com.
Click the Account icon in the top navigation bar.
Click the domain you're using.
At the right of the page, under Control Panel, click Domain Management to expand the menu.
Click DNS Record Management.
On the DNS Management page, select TXT from the Add a Record drop-down.
Your cursor will automatically move to the Record Host field (to the left of your domain name). Leave this field blank.
In the Record Answer field (to the right of your domain name), copy and paste the following unique security token:
When you've done saving the TXT record, click the Verify button below on this page.
Congratulations! Your new DNS TXT record now contains your security token. Keep in mind that changes to your DNS settings can take up to 24 hours to propagate through the Internet, but depending on your host, this can happen faster.
If you have trouble adding your TXT record, contact your domain host directly for further assistance. If you're not sure what to say, here's a sample explanation that you can email to your host or read over the phone.
','NetworkSolutions.com':'
Log in to your account for reflector.webtropy.com at www.networksolutions.com by clicking the Manage Account icon.
In the left navigation bar, open the nsWebAddress (Domains) menu by clicking the + icon.
Click Manage Domain Names.
On the Domain Details page for the domain you're using, select the Designated DNS radio button (to the right of Change domain to point to) and click the Apply Changes button.
If you've previously modified your advanced DNS settings, click Edit (to the right of Domain currently points to).
Under the Advanced DNS Manager heading, click Manage Advanced DNS Records.
Under the Text (TXT Records) heading, click Add/Edit.
In the Host field, enter @.
Leave the TTL field set to the default value.
In the Text field, copy and paste the following unique security token:
When you've done saving the TXT record, click the Verify button below on this page.
Congratulations! Your new DNS TXT record now contains your security token. Keep in mind that changes to your DNS settings can take up to 24 hours to propagate through the Internet, but depending on your host, this can happen faster.
If you have trouble adding your TXT record, contact your domain host directly for further assistance. If you're not sure what to say, here's a sample explanation that you can email to your host or read over the phone.
','Register.com':'
Log in to your account for reflector.webtropy.com at www.register.com.
Under the blue My Accounts tab, click the domain that you're using.
Scroll down to the Advanced Technical Settings heading and click Edit TXT Records (SPF).
Leave the Host Name field blank.
In the TXT Record field, copy and paste the following unique security token:
When you've done saving the TXT record, click the Verify button below on this page.
Congratulations! Your new DNS TXT record now contains your security token. Keep in mind that changes to your DNS settings can take up to 24 hours to propagate through the Internet, but depending on your host, this can happen faster.
If you have trouble adding your TXT record, contact your domain host directly for further assistance. If you're not sure what to say, here's a sample explanation that you can email to your host or read over the phone.
','Yahoo.com':'
At this time, Yahoo DNS hosting doesn't support TXT records. If you bought your domain through Yahoo, please use the HTML file method of verification above.
','1and1.com':'
1and1.com doesn't support the TXT method of verification. Please select another verification method from the above list.
We're excited to introduce today a highly available and scalable Domain Name System (DNS) service - Amazon Route 53. It is designed to give developers and businesses a reliable and cost effective way to route end users to Internet applications by translating human readable names like www.example.com into the numeric IP addresses like 192.0.2.1 that computers use to connect to each other. Route 53 effectively connects user requests to infrastructure running in Amazon Web Services (AWS) -- such as an Amazon Elastic Compute Cloud (Amazon EC2) instance, an Amazon Elastic Load Balancer, or an Amazon Simple Storage Service (Amazon S3) bucket -- and can also be used to route users to infrastructure outside of AWS.
A reliable, cloud-based DNS service has been one of the most requested offerings by our customers. With Route 53, you can create a "hosted zone" to add DNS records for a new domain or transfer DNS records for a domain you currently own. Route 53 is also designed to work well with other AWS offerings, such as AWS Identity and Access Management (IAM). By using AWS IAM with Route 53, you can control who in your organization can make changes to your DNS records. In the future, we plan to add additional integration features such as the ability to automatically tie your Amazon Elastic Load Balancer instances to a DNS name, and the ability to route your customers to the closest EC2 region.
Route 53 is also designed to be fast and simple. It uses a global network of DNS servers to respond to end users with low latency and has an easy-to-use, self-service API. There are no long-term contracts or minimum usage commitments for using Route 53 - you pay $1.00 per month for the hosted zones you manage, $0.50 per million queries for the first billion queries, and $0.25 per million queries above a billion.
.my DOMAIN REGISTRY is pleased to update you on the status of our Resellers.
We currently have 61 Resellers. These Resellers are authorized by .my DOMAIN REGISTRY to provide services in relation to ".my" domain names which include acting as payment outlet for ".my" domain names.
Please note that Smart Team Networks Sdn Bhd (R044) (Business Registration No: 646967-W). ("Smart Team") is no longer the authorized Reseller of .my DOMAIN REGISTRY.
Due to the cessation of Smart Team as Reseller, this entity is no longer authorized payment outlet for ".my" domain names.
Please contact us at domreg@domainregistry.my or call +603-8991 7272 should you have any inquiries at all.